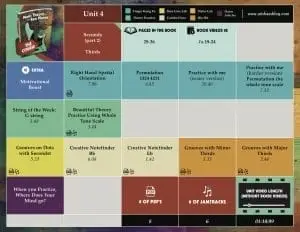
Take a look at a typical unit (This is the actual Unit 4 in its entirety!)
Click on the tabs below to navigate through this unit of the course.
Welcome to a Tour to Music Theory for the Bass Player – The Course! This is what a “Unit” looks like – this is the actual Unit 4!
This is one of 20 units of Ari’s course “Music Theory for the Bass Player”.
Music Theory for the Bass Player – Unit 4
Tip of The Unit
Goals for Unit 4
- More on seconds
- Interval of the week: The Thirds
- Continuing on with our miniseries of open strings practice for spatial awareness and right hand fitness
- This unit’s permutation exercises
- Note finder variations (now over the entire fretboard and incorporating thirds)
- Stacking major thirds creates a beautiful sound, is great technique practice and provides for creative improvisation over a beautiful track
- A cool dot-oriented chord sequence as practice ground for groove creation and including seconds into groove creation
- Notefinders incorporating major and minor thirds
- A hip bit including thirds into groove creation. What if the root is not on the down beat?
- Review from previous unit as needed
Read and Watch – Book pages to read, book videos to watch
In this section of the course we go over the material from the book. Navigate the TABS for where we put these book pages to use!
Read Pages 29 through 32
- Read – Seconds Part 2
Read Pages 32 through 36
- Read – Thirds
Technique: Right Hand Spatial Orientation
- This unit’s open strings exercises use the low E string as a pedal.
- Again we do more basic as well as more challenging variations.
- Again we practice alternating m and i, and make sure to avoid raking.
- Groups of three notes per string force us to always start with a different starting finger (advanced versions)
Purpose and Benefits
- This unit’s open strings exercises use the low E string as a pedal.
- Again we do more basic as well as more challenging variations.
- Again we practice alternating m and i, and make sure to avoid raking.
- Groups of three notes per string force us to always start with a different starting finger (advanced versions)
Permutation journey 1324 4231 with shifts
- This unit’s permutation numbers are 1324 and 4231, but now we are including the lowest area of the bass
- In the advanced version we are “permutating” these numbers using the whole tone scale.
- Reminders: To get a strong and powerful bass sound, pluck towards you (versus classical guitar style), keep fingers close to the fretboard, don’t overgrip the neck, relax and go for economy of motion.
Purpose and Benefits
- Left hand coordination and fitness
- Practicing shifting up and down a string
- Left/right hand coordination exercise
- Finger independence in the one-finger-per-fret position
- Monitoring for good posture
Practice With me!
We are doing permutations 1324 and 4231 at tempo 98 on the G string all the way up to the double dots, then we turn around and descend. We are also doing this on the D string.
While doing so we are putting our attention on various details:
- from saying note names to “mimi” or “imim” for right hand plucking
- to keeping the shape of the one-finger-per-fret-positionduring shifts intact
- We will be using mental bookmarks and other tricks to help us during shifts
Practice with me
Practice with me!
In the advanced version I practice “permutating” the whole tone scale up the bass this way. It’s a brain twizzler!
Notes up on a String
String of the Week: G-string
A great exercise that is very short and effective.
- Advanced players, up the tempo.
- Basic players, let two, three, four clicks go by before you say the next note name.
- Always use a click
Initially use the keyboard graphics as visual helpers, later visualize the keyboard internally. Play notes on the G string while naming them out loud. Saying them out loud is important because hearing yourself say the note names creates an additional reference and feedback loop to deepen the learning.
Purpose and Benefits
- Further familiarity with the note names
- Starting to create an internal reference of where the note names are on the bass.
- Getting used to saying the note names while playing.
- Getting used to practicing with a metronome saying various subdivisions.
Beautiful Theory Exploration
Here we are stacking major thirds over all four strings and move them up the whole tone scale.
Create rhythmic figures within each position to create a groove-like figure. Observe that the highest and lowest notes are the same; stay aware of the note name of that note (you can say it out loud for reinforcement).
Purpose and Benefits
- Ingraining major thirds starting from each finger.
- This is an excellent technical exercise for reinforcing one-finger-per-fret.
- Identifying the sound of the whole tone scale
Prerequisite:
- 18
Grooves on Dots with Major and Minor Seconds
Grooving over the chord progression from Unit 2, which keeps us on the first three dots of the E and A string. But now we are incorporating major and minor seconds above and below the root into our grooves.
All the notes we are adding are a major second above and below the roots, except for the third fret (first dot), where the variation below the root is a half step.
We will be observing what effects using the addition of the seconds above and below have on the overall groove and how the feel changes depending on which of the notes we place on the down beat.
Purpose and Benefits
- Experiencing the effects of placing seconds above and below the root in a groove
- This is a great blueprint to spark ideas for groove creation, using just roots and seconds
- Gaining insight into the various effects of note choices and placement in relationship to the down beat
Note: The included transcription is for reference only. Use it to check parts that interest you, but try picking it up by ear first.
Chord progression: || Em | C | D | Am | G | B ||
In this course we do Note finders with all 21 notes.
Systematic wins the day. We vary the back ground tracks, style and assignments with each note to keep it interesting and fresh! It is a great workout for fretboard knowledge and groove creation!
Once we went through all 21 notes we do
Creative Notefinder Bb and Eb
Bb and Eb are this week’s creative note finder exercises, but we are extending the range over the entire fretboard now, so go ahead and dive into “above double dots” territory.
Another new variation this week is that we say the fret number out loud.
There are two back ground tracks:
Bb: add the minor third to your groove
Eb: add the major third to your groove
Note: The included transcriptions are for reference only. Use them to check parts that interest you, but try picking the bass lines up by ear first.
Purpose and Benefits
- Practicing Bb and Eb all over the fretboard
- The point of practicing the notefinder with thirds is to practice the shape of thirds all over the fretboard and to land on the note on the next string with that shape in place already
- Practicing major and minor thirds in various fingerings
Creative Styles Practice
Here we explore various styles, practice sample grooves and go (I mean WALK, as in WALKING BASS) from pop to funk to rock to reggae and Jazz…
Build Your own Groove
Here is a hip groove starting on the minor third. Then we are adding in major seconds, first from above, then from below. We will do this in major and minor variations. The chords are all powerchords, meaning they have no thirds in them, so they sound open and neither major nor minor:
Chord progression: || C5 | F5 | G5 | C5 ||
Purpose and Benefits
- Bassline creation using thirds, then thirds and seconds
- Further ingraining the shape of the thirds and seconds
- Distinguishing between the sound of the major and minor thirds
Note: The included transcription is for reference only. Use it to check parts that interest you, but try picking it up by ear first.
Unit 4 – video 10 – Grooves with min 3rds – example 1
Practice Tip
When you practice, observe what your mind does.
Where does your attention go?
Is there a commentator inside your mind?
What is s/he saying, if anything?
For now, don’t judge your mental activities or try to change what is going on, but pick a focus for your attention which can be any aspect of any exercise (maybe the tone you produce, how tightly you are on the click, the position of your pinky finger or not overgripping the neck) and as you notice your attention wandering to other things, bring it back to the focus you selected.
Just observe and return to your focus of attention. That’s all.
Sound like meditation? Yes. bass meditation. Try it! When we are practicing as we are here, we are training the mind (not just the fingers!) on a very deep level. You might as well go all the way with this and get maximum results.
By the way, this also helps if you are nervous. Put your focus on a select and narrow aspect of your playing and put your attention there. The more you practice this when you practice, the easier it will be in a stressful situation and the deeper your concentration will be. Without effort.
Resources
Download all Audio
Download disabled in this demo.
Download all Transcripts/TAB
Alan’s Log
Download disabled in this demo.
Unit 4 Matrix

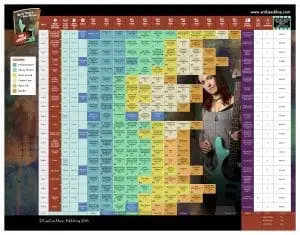
Course Matrix (Wall Chart)

Resources: My own experiences with hundreds of students, Wolf Wein’s work with Qui Gong, my own yoga and movement/relaxation activities
