Chromatic Scale Shedding
 This is one of the most freeing and fun exercise imaginable – shedding the chromatic scale in a musical way using a delay pedal. If you don’t have one, you can get the Flashback Mini from TC for under 70$. Worthwhile investment. But no matter what piece of equipment you are using, a delay pedal makes the chromatic scale sound super hip and will give you lots of ideas how to use it in a musical context.
I bet you never thought practicing scales could be so much fun!
Enjoy !
I use Marleaux Basses and Dean Markley Strings. TC ElectronicsPedals, cabs and amps! Fretwrap byGruvgear.
(Ariane Cap is an official endorser for all these fine companies.)
Thanks to Wolftrackaudio.com for audio post production.
Transcript:
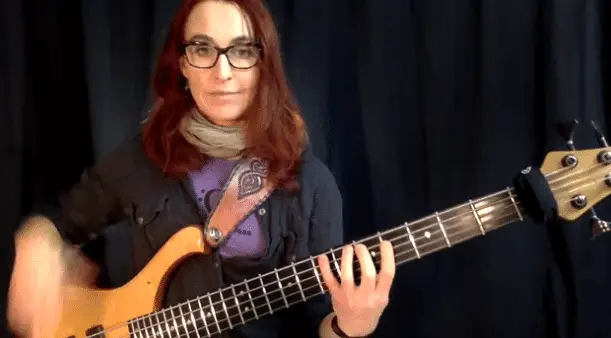
BASS BIT #9
[Intro playing: 0.00 to 0.10]
I find this exercise super freeing so I really really encourage you to do it. I love practicing with the delay pedal because it always sounds like music and especially with something like the chromatic scale we like to think: “That’s not really music. That’s just a scale. That’s just a theoretical thing.” But you can do super hip things with the chromatic scale. You can use it for walking because chromatic notes are approach notes so whenever I do something in half steps, it gives my line direction. So especially [playing: 0.41 to 0.42], see? When I do a walking bass like this [playing: 0.45 to 0.48], I can play a whole walking bass line always just chromatically approaching my next root. So I’ll play [playing: 0.52 to 0.56] root, approach approach approach root, approach approach approach, root. Right, that’s just one way to do a walking bass. Lots more to talk about that. That’s on for a later video.
But the reason why I think it’s really important to practice all these scales and concepts in a musical way is because they do occur in songs and music and you can have so much fun with them: and if you know where to go on the fret board, you are golden.
I love practicing all these concepts with a delay pedal. Paul Hanson, my duo partner, does incredible things with a delay pedal and I looked over his shoulder a little bit. But it always sounds musical. So this is the setting that I use for the delay pedal:
- Set to a dotted eighth note;
- I have the delay sound on “delay line”. Don’t use “dynamic” because what you want [playing: 1.39 to 1.40] is that the delayed note sounds as much as the original note that you’re playing. For the exact same reason you want to:
- keep the mix exactly in the middle – 50/50 and
- the mod level on zero, no modulation at all.
- the color, just between analog and digitial and
- the feedback needs to be on zero so that you get one [playing: 1.58 to 1.59] delayed note only.Okay, so I’m playing one note [playing 2.01 to 2.04]. And in order for this to sound cool you want to play the notes short. So I’m going to demonstrate what I’m gonna do: I’m gonna just have a heck of a fun time just playing the chromatic scale.
[playing: 2.13 to 2.32] It’s so freeing because it’s the chromatic scale and there are no wrong notes, because you are using all of the notes there are. And everything you do, you can move in any interval you like just keep it the same there are no wrong notes, right? So just go for it.
I find it an incredibly freeing exercise. There is no tonal centre, there is no chord symbol. Right now that we’re talking about it, I just want you to explore the way your bass sounds if you use [playing: 2.52 to 3.01] all the notes on the bass. And by using the delay pedal, I could do that. And it’s a symmetric scale so anything you find that you like you can move up in multiples of the interval by which the scale is symmetric and this scale is symmetric by the minor second. So you can move it any old way you want: pick any kind of amount of steps. Officially we haven’t learned the other intervals yet but just pick two frets, three frets, four frets and just keep moving it around. Just keep it consistent and it’ll sound cool. I can do things like [playing: 3.27 to 3.32]. There’s things that cross strings. I can do [playing: 3.34 to 3.39].
I mean you can come up with the most outrageous thing and it’s always gonna sound great. You have no obligation to any kind of tonal centre. If there is a tonal centre, you will want to know how the chromatic note sounds different than the notes that are part of the scale that would be spelling out the chord. We’ll get to all of that in later videos. But this is just to say you can use chromatics even if there are tonal centers!! I think it’s really important to know what the notes in the tonal centre are, how they sound, if I use those, and what it sounds like if I use the chromatic fare, which has a completely different flavor. But I think it’s a wonderful thing to do, to just kick in the delay pedal and just go crazy. 🙂
[playing: 4.23 to 4.29] You are allowed to do anything, as outrageous as it is and that pedal [playing: 4.30 to 5.00] is gonna make it sound great no matter what you do.
So have fun with that. I hope that gives you some ideas. It’s great if you’re a beginner, it’s great if you’re advanced, you’ll have, your fingers will be ready to do some fun stuff. They are also good technical exercises as you’re seeing. And right now I have a tempo of one hundred twenty on my delay pedal you can take that way down. Tempo a hundred, I’ll play you what that sounds like [playing: 5.21 to 5.38].
So the rhythmic value of the delay pedal is the dotted eighth note so what happens is I play a note [playing: 5.45 to 5.46], and then a dotted eighth later comes the delay. Now I’m gonna try to place another note right in between so that I play in a note, note delay. And so what I get is this continuous rhythm of sixteenth notes [playing: 6.02 to 6.05]. And it takes a little bit of practice to just sort of get the hang of it so that when the delay comes back at you, you feel that pulse.
[playing: 6.11 to 6.41] You can step on it for fun and then you let it run again. Another tip when you’re playing with the delay pedal is make the note short because the nature of the delay is that, if you make them sustained, it will sound like this [playing: 6.50 to 6.53]. And then it’s much harder to find where the rhythm is – so make them short [playing: 6.56 to 7.03] and then you get a much better effect. Things that sound cool by the way, is [playing: 7.07 to 7.14] play one note short I mean low. The other one’s high or the other way around [playing: 7.16 to 7.21].
Okay that’s another thing that’s fun.


 gift for you: readers of my blog can now get 15% discount on my course “Pentatonic Playground for Bass”. Order by clicking through below and using the code AdventatonicPG