Pentatonic Box Shapes – Help Me Name These!

Recently David asked me in a LinkedIn comment:

Hi Ari!! Your 5 pentatonic shapes lesson has had a major impact on my playing. Fills are easier, the fretboard makes more sense and feels connected. And I have a framework for soloing. I cannot thank you enough. But I have a question. do you have a similar approach for a five-string bass? I feel like I should probably be able to figure it out but can’t seem to. Any thoughts would be greatly appreciated.

Sure thing, happy to help! Good questions get blog post answers. I will start with what David is referring to and then answer his question. Let me unpack this a bit…

Thinking Inside of the Box (Shape) (also: Five String!)

My philosophy about teaching theory to bassists and other instrumentalists and improvisers is: use shapes. There are many ways to conceptualize music via shapes: shapes fingers make on the fretboard, auditory shapes, letters and numbers (theory shapes!), and visual shapes (patterns on the fretboard). On the bass, they represent in beautifully symmetric patterns on the fretboard or notes on a staff. In this post, I focus on visual shapes on the fretboard.

Now, reading is important too, and I am certainly not saying to skip that- but it may not be the best place to start. Here is why: most bassists already know a lot more theory than they realize if they’re already playing songs. Major pentatonic? My Girl (guitar line). Minor pentatonic? Play that Funky Music, Sir Duke, Master Blaster…

To tell you to forget all you know and hunker down with a book that teaches ‘every good boy does fine’ on page 1 followed by pages and pages of scales and arpeggios always struck me as highly counterproductive. Learning to read is quite complex on the bass – because you can find any given note in multiple places on the fretboard – so it makes better sense to use a system and a method that makes it more economical. I think it is much better to build on what you already know – namely shapes on the fretboard. Decode those, give them names (scales and arpeggios, ie theory!), practice systematically and you have a powerful tool at your fingertips. Then reading becomes much easier: you will recognize the theory shapes as “chunks of information” on the staff and be able to easily translate them onto the fretboard – especially if using consistent fingering! That’s why I’ve always looked to meet the student where they are at by recognizing they tend to know songs and shapes.

  • Teach theory through shapes on the fretboard with consistent fingering
  • Systematize all over the bass
  • Use descriptive mnemonics (e.g. “Big-Box, Little-Box”) to make those shapes memorable and easier to visualize and recall on the fretboard
  • Create engaging improvisation exercises to help ingrain the theory in your head and under your fingers to enable you to create your own grooves and fills!

Symmetric Box Shapes – Gimme Five!

Early on, I appreciated the symmetric nature the pentatonic scales form on the bass fretboard. I overheard a guitar player say something about a “box” shape – I could immediately imagine what he meant – a symmetric fingering between two strings. I liked that term because it is very descriptive so I went all the way with it and labeled all the shapes with equally illustrative nicknames (see below). And with that, I had one great way to play and organize pentatonic scales all over the fretboard!

The Five Major Pentatonic Shapes 

Source: Music Theory for the Bass Player by Ariane Cap


MAJOR Pentatonic Ariane Cap

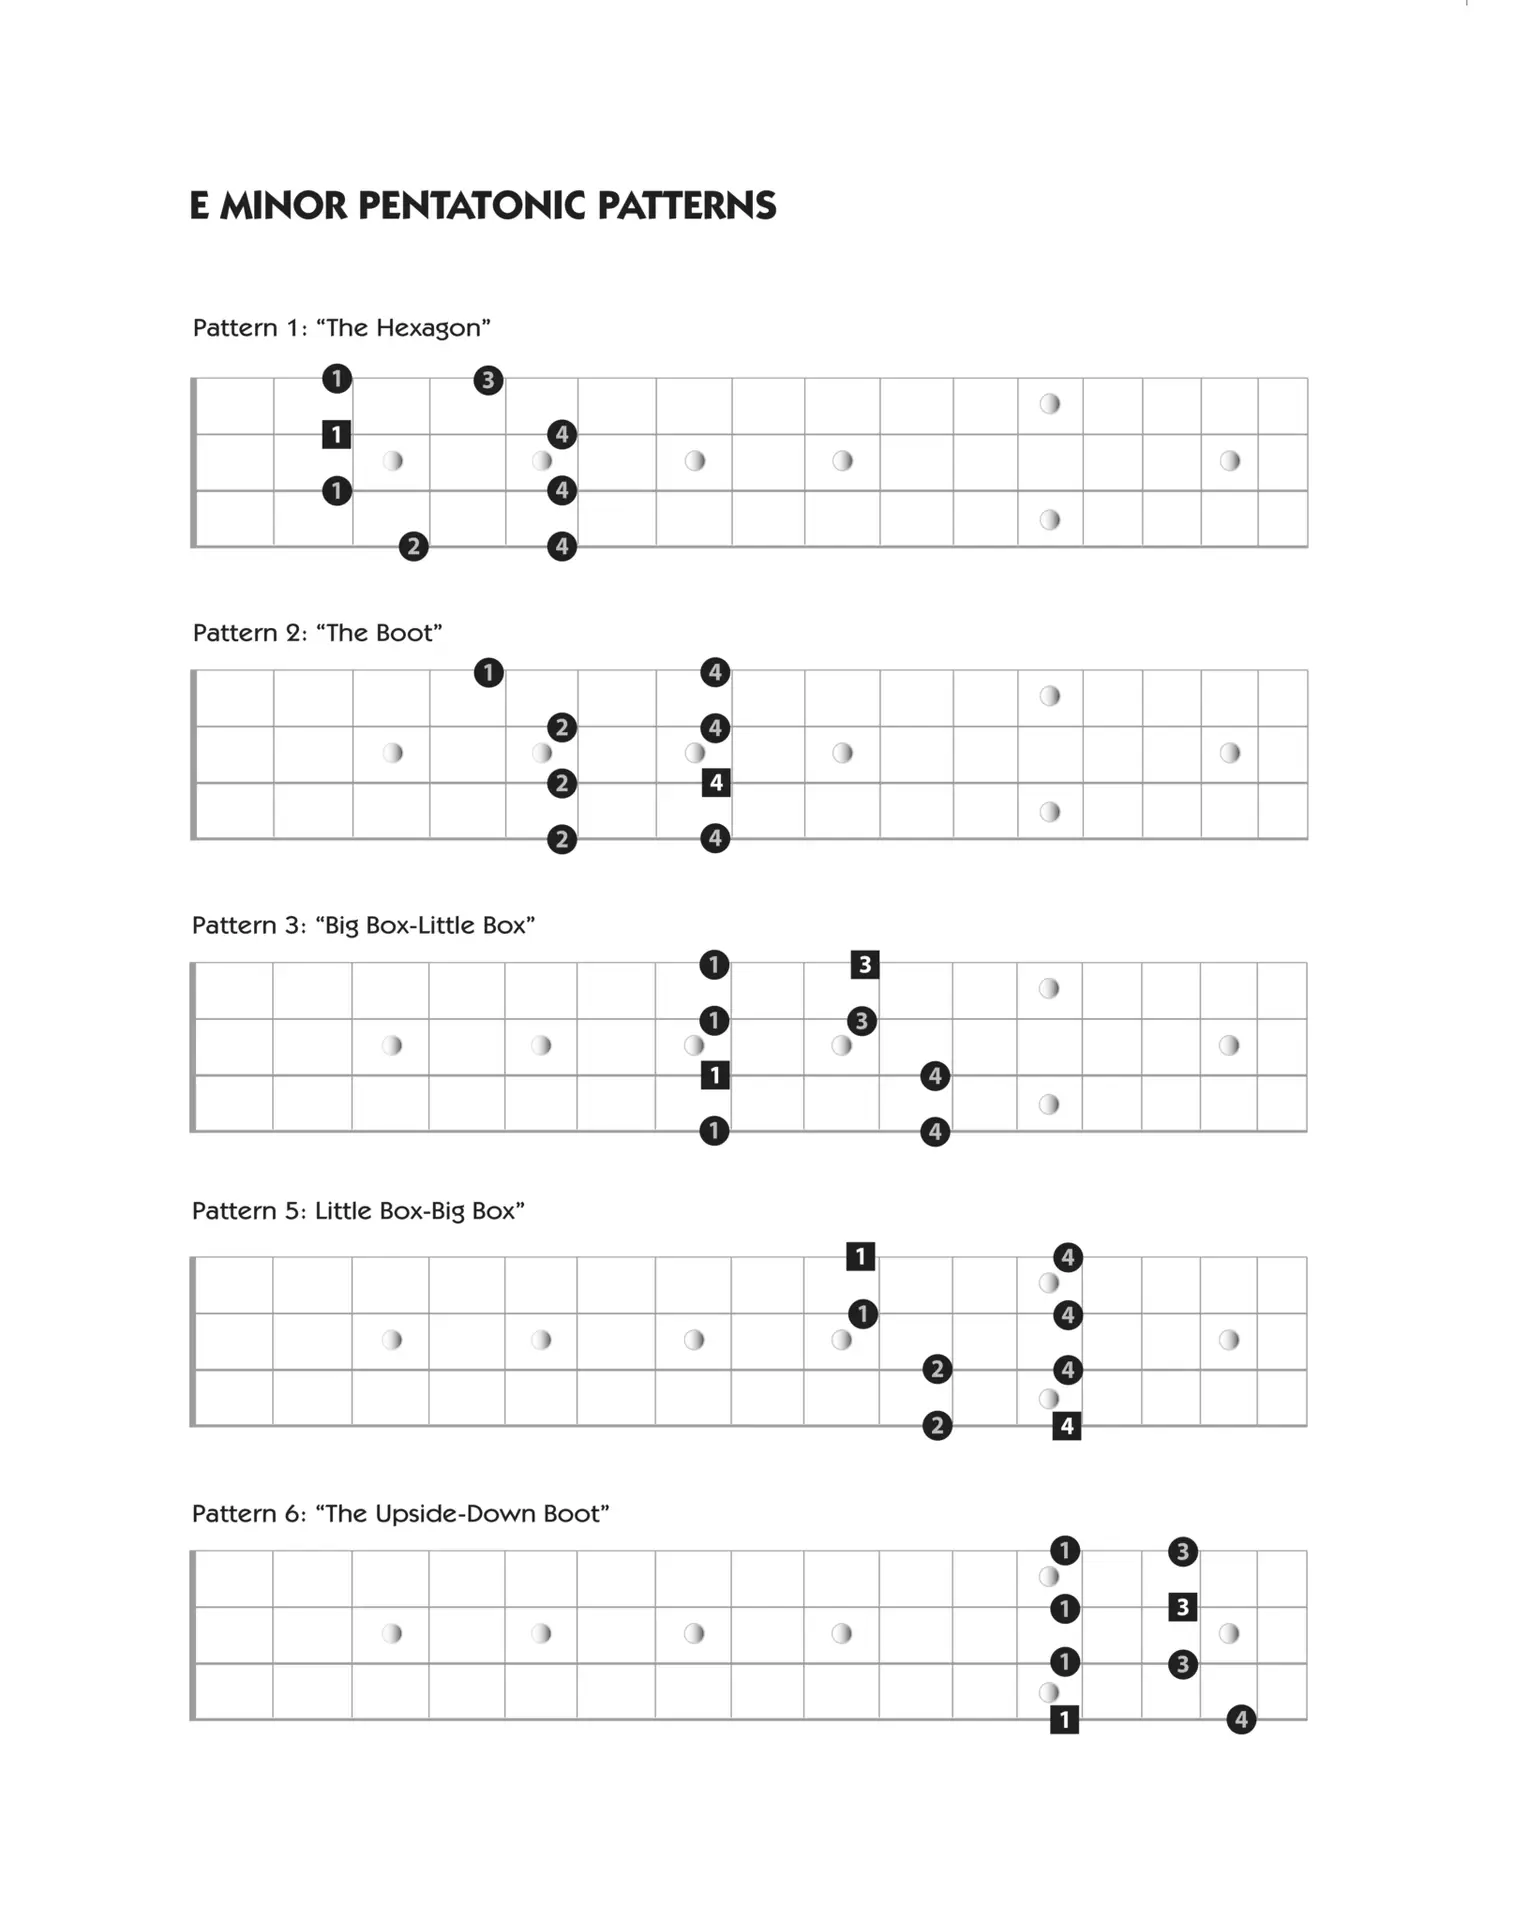
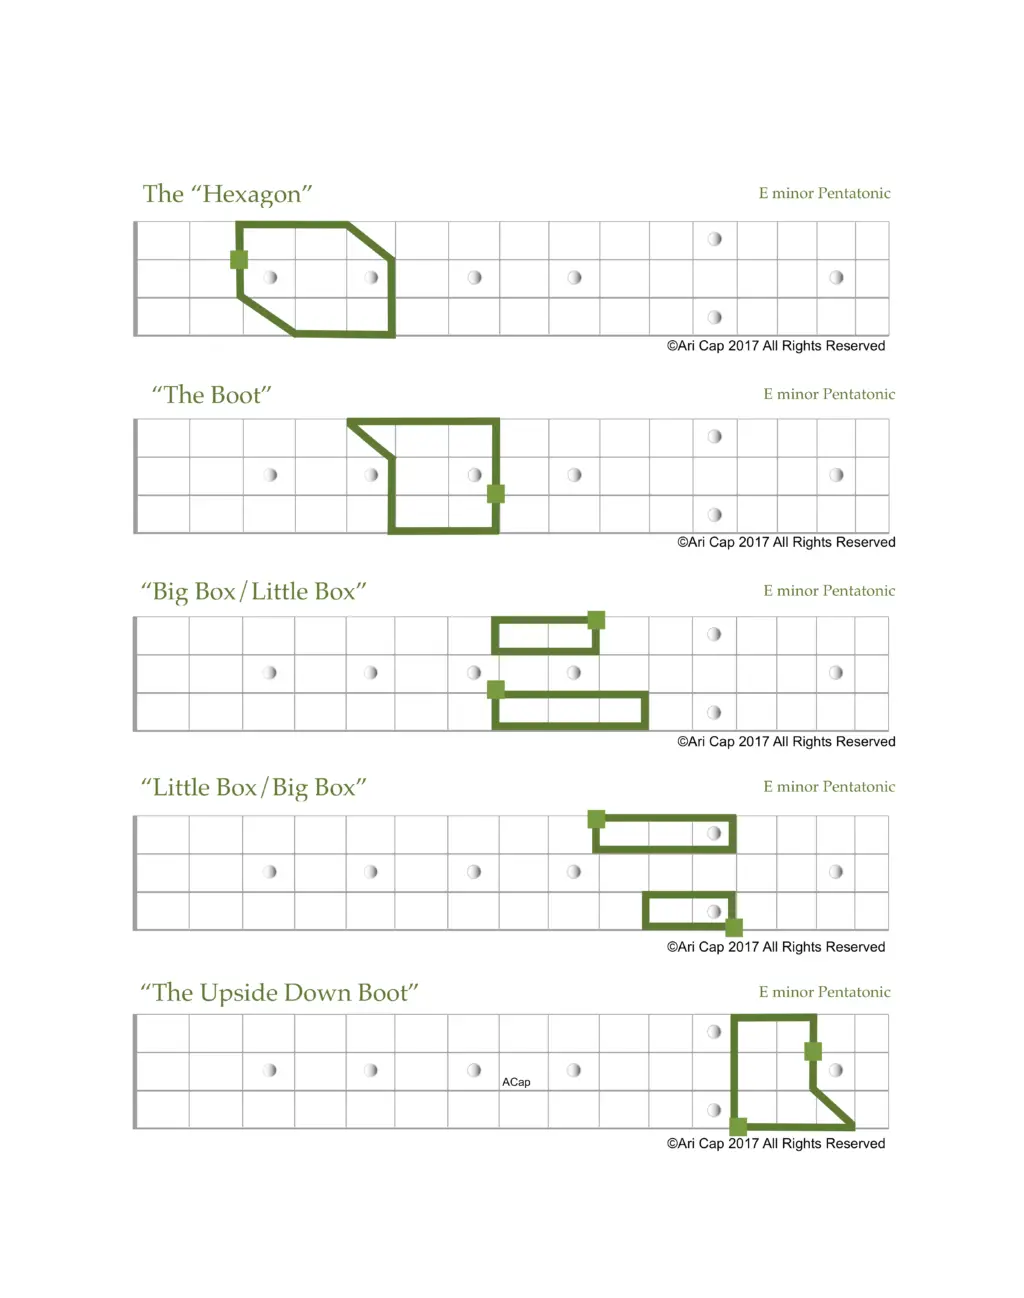
The Five Minor Pentatonic Shapes 

Source: Music Theory for the Bass Player by Ariane Cap 

MINORANE CAP PENTATIE minor Pentatonic Box shapes Ariane Cap

The truth about Pentatonics is that sometimes players use them quite incorrectly. They often go diagonally up the neck in order to keep – to use my terminology – “little boxes “ with easy fingering… and they do so with little awareness of where the key center is and with more “generosity” than sounds right as for the notes themselves (meaning, “fudging it a little”).

If you’d like to get the notes right and be able to play these shapes up and down the neck on any given two strings, diagonally in ever so many ways, and comfortably within one position, check out my five pentatonic shapes below. They form the starting point for many exercises. Some of these I taught in countless classes including on Scott’s Bass Lessons, my Talking Technique series on notreble, and on TrueFire where I published an entire course on the topic called Pentatonic Playground for Bass.

Many have seen or heard me talk about some of my favorite “Groove & Fill“ exercises using the “Big Box – Little Box” pattern. These exercises are not only highly educational but also a favorite with my students who want to start creating their own grooves and fills using theory shapes. 

I do these exercises with players of all levels. They are fairly easy technically – because they use only two notes per string they are perfect for beginners while they offer countless possibilities for cool sounding licks and fills for players of all levels to enjoy.

In my upcoming book, “The Pattern System for the Bass Player” you will learn much much more about this.  You will also solve the flummoxing question of why there is no Pattern IV (did you notice that in the above diagrams? Not a typo!)  

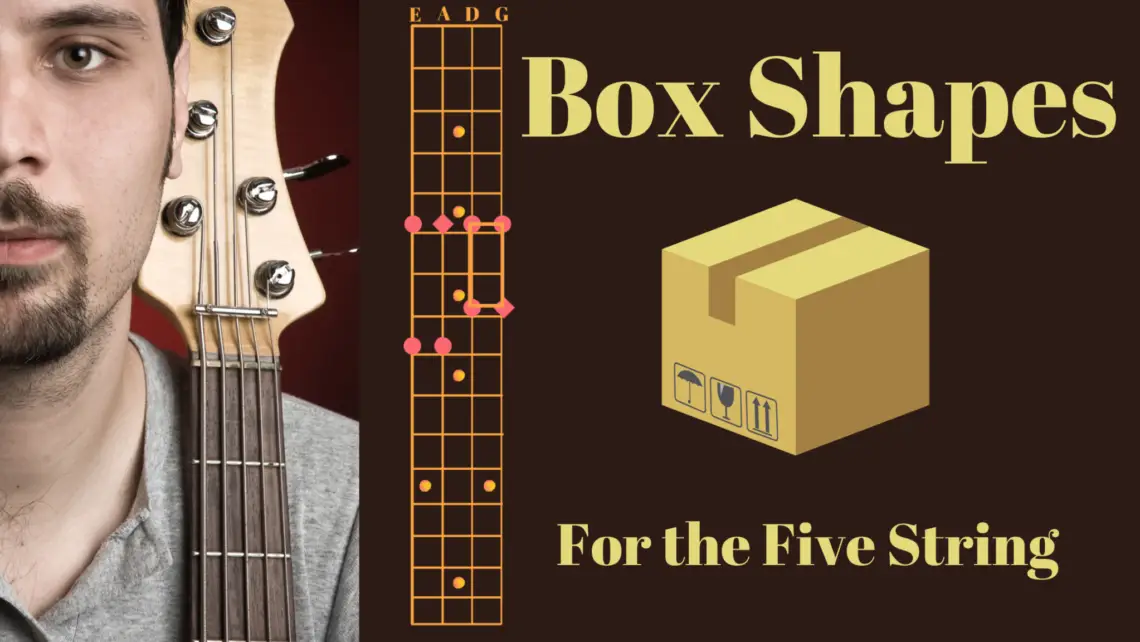
Pentatonics for the Five-String! 

Time to return to David’s question!

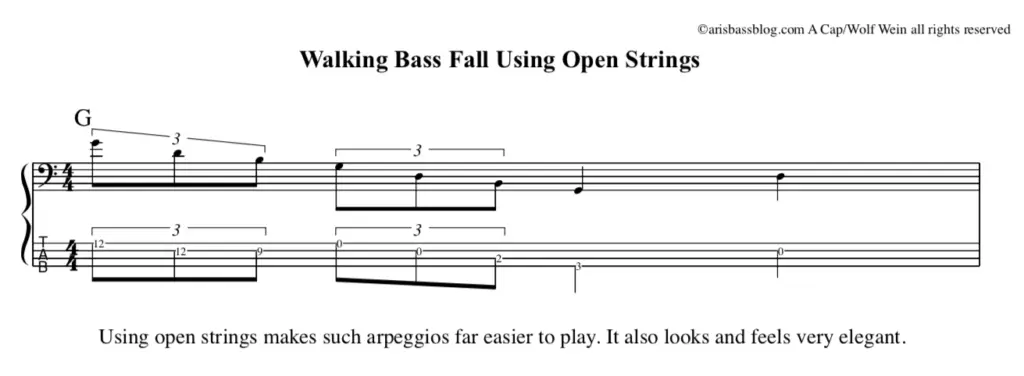
Here they are (though it is even better if you draw them up yourself!)

Five String Pentatonics Ariane Cap

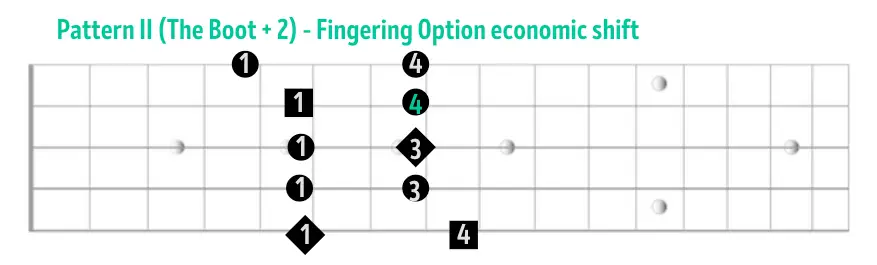
As you can see, for almost all shapes you just add two notes on the low B string and the fingering falls right into place. The only change is Pattern II (“The Boot”) which you conceptualize differently between the four-string version (starting with 2!) and the five-string variety (starting with 1!). While on four-string no shifts are every required for pentatonic shapes, a shift is required for the five-string “boot” which now turns into a symmetric shape (that needs a memorable name, by the way!). There you have two options, 

Option 1 (finger 3 on A of the D string)

This option has the advantage that your hand keeps its shape during the shift. The disadvantage is you need to have a “good aim” as you shift keeping your hand’s form:Ariane Cap pentatonics


Option 2 (finger 4 on A of the D string)

Here you make your hand comprise only 3 frets momentarily before fanning back out into a one-finger-per-fret position. The disadvantage is that you have to change the shape of your hand for a second but the advantage is that you absolutely do not have to look at your fretboard – a great option for reading. In my upcoming book, this movement has a name. You will also learn more about combining the shapes for diagonal movements or moving up and down two strings at a time.

So What Names Can You Come up With For The Five-String Shapes?

Help me name them or create your own to remember them!

And, thanks for the great question, David! The Pentatonic scales (major and minor) are such an integral part of music bassists often play – there are so many instantly recognizable tunes based on these ubiquitous scales. Here are just a few examples:

♦ Major Pentatonic – Sir Duke, My Girl

♦ Minor Pentatonic – Money, I Shot the Sheriff, Play That Funky Music

What other tunes can you think of?


Related Links:

Mnemonics (part 1)

Mnemonics (part 2)

Upper Structure Pentatonics: Thinking Inside the Box

Can you Pull Off Pull-Off Pentatonics?


Pentatonic Playground for Bass DVD TrueFire Ariane Cap
Check out the DVD that started it all…
Ari's Core Principles
Get a short course that uses pentatonics for grooving and filling…

Ari, I am cheating!

Cheating Bass

Ari, I am cheating!

I am often amazed at what my students think constitutes “cheating” and hence dutifully try to avoid.

Let’s clear up some misunderstandings:

  • It will help you stop shooting yourself in the foot
  • Allow me to take a load off your shoulders

Here are the top 6 “cheating” myths I keep hearing:

#1 – Using open strings

I get it: your bass doesn’t have a zero fret, so you may have concerns about consistency in tone between fretted notes and open string notes. Truth is, notes do sound differently for a variety of reasons… and that’s okay! Embrace the organic sound of the instrument and instead work on your technique! Specifically on consistent timing, tone length, and tone volume. Learn optimal finger placement with your left hand fingers and pay attention to producing an even sound from your plucking with your right hand. This is so much more important than fretting (or, rather, NOT fretting!) the occasional open string!

Plus, sometimes open strings truly are the only option.

A few examples:

  • The open string is a must here:

  • Upright players love using the open string. Try a hip drop like this without open strings – it would be much harder to play and kill all the charm:

Aris bass blog cheating

  • Bakhiti Kumalo’s iconic bass lick in Paul Simon’s “Call Me Al” uses three open strings:

  • Open strings can be a lifesaver when you are sight reading and need to change positions! Use them!
  • And they sound great for chords! Listen to this example from my Duo OoN where I move triads on two strings up and down while pedaling the open D string:

Play a tune like: Play that Funky Music. Ever been bothered by the sound of that open E string? See, I thought so!

Bottom line: Don’t feel bad playing an open string!

⇒ Using an open string… Not cheating!

NOTE: If you are using the open A because it’s the only A you can find on the fretboard, well that’s another matter. In that case, I prescribe the Creative Notefinder exercise from my book on page 12. You pick a different note each week, do the drill for five minutes daily and soon enough you won’t have any problem finding notes all over the fretboard!

HAPPY FACT: I think they are called open strings because you need to remain open to them! 

#2 – Using a metronome

Some claim that using a metronome for practicing hinders the development of a good internal sense of timing. As a generalized statement, I find this completely false. When incorporated correctly, the steady beat can accomplish the opposite. It will fine tune your timing, and it provides unflinching and immediate feedback.

My upcoming book on the systematic study of musical patterns contains an extended section on why, how, and when to use a metronome (and when to skip it). There are so many benefits to using one! So use it! Focus on it carefully while playing and try to “kill the click”- that is, make the sound of the click and the bass note one singular sound. It’s delicious when you are on top of the beat like that! Do not deprive yourself of this training and experience!

If you are unsure about the precision of the subdivisions of a groove, set it in your metronome and work on matching it exactly. It will help you to steady difficult and syncopated rhythms. (In my new book you’ll get to know our new sidekick, Skippy, who is a little metronome with an attitude! Skippy is highly sensitive – don’t accuse him of cheating or anything other than being the amazing superhero he is…)

⇒ Using a metronome… Not cheating!

#3 – Writing down fingerings or marking your chart

Let’s say you keep forgetting the accidental in bar 3. Or you are struggling with a new section and rather than slow down to figure out the issue and write it down so you remember it – you clench your teeth and hope that when you get to that bar the umpteenth time you will just magically nail it.

Please stop. Literally. Stop playing, lower the bass, pick up a pencil, and diagnose the problem. Write in that elusive sharp or flat! Test out some good fingerings. Find the best one and write it down! Keep tweaking until it is perfect (that’s why you use pencil, not ink!). Pro musicians’ charts are full of all sorts of markings, including phrasing, parts, solo order, etc. These markings are proof of proper practice, which includes analyzing, experimenting, and refining. Rationalizing your way out of practicing properly – now that’s cheating! Instead: mark proudly, then play loudly!

⇒ Writing down fingerings and marking up a chart… Not cheating!

#4 – Practicing

This myth goes something like this:

You must never practice. The ultimate secret is to know everything right off the bat! From the first time you attempt it, you must nail it flawlessly. If there is something that sounds off, ignore it and keep going. “If you pretend it did not happen, it didn’t happen.”

Practicing is admitting weakness. Practicing is cheating, pros never practice! Only those without talent practice. Mistakes add character. Don’t ever be caught practicing!!

Okay, I hope this made you laugh.

Do practice. Thoughtfully and often! Break musical pieces into small bits – optimize fingering, phrasing, interpretation. Loop these bits. Then loop bigger bits. Have a plan and have benchmarks to meet. Pros practice, so should you.

Practicing is like being on a treasure hunt – you must find the gold by looking for it. Be your own coach and cheer yourself on!

⇒ Practicing… Not cheating!

#5 Using a pick. Or your fingers. 

There is no one “right answer” to this. The right tool is the one that produces the right sound for the song or segment, dig? I have very little patience for these discussions. Neither fingers nor picks are superior, nor are they “cheating”. They are tools to get a certain sound or to play certain lines. Expand your playing techniques and get more gigs!

⇒ Pick or no pick… Not cheating!

#6 Playing a five-string, or four-string, or six-string

Let’s turn to the YouTube comment section for some interesting and familiar quotes:

Video 1: “You must be really good – you play six string!!”

Video 2: “Wow, you are awesome, you played this piece on a four string!!”

For crying out loud, stop it! Each string combination has unique challenges and benefits. Choosing the best tool for the job is not cheating! And by the way, wielding a mighty six-string axe will not cover up for bad playing, nor will a four-string make you sound more “authentic”. If you have a personal preference – high five! (You decide if this is a pun!) But don’t insinuate your choice is the only valid one or that somehow you are cheating by choosing one over the other. (Although trying to get bragging rights because you are wielding a sixer just to look more serious might count as such!) Love the player, not the string number.

⇒ Number of strings on a bass… Not cheating!

Ain’t Gonna Lie…

…some of these are hard to hear and even harder to eradicate. I am sad to see limiting beliefs hold players back. Not only are you shooting yourself in the foot by thinking a useful thing is cheating, but you are also really putting an unnecessary burden on yourself. Don’t! Instead, go practice and enjoy the progress you are making!

You might also like:

Practice with a Purpose

A Little Trick that works Wonders

Mistakes in Practice

Stop! Don’t Practice a Mistake!

I just want to learn songs….

Powerful Practice Tip


A great course to get good technique habits dialed in…

Ari's Core Principles

Power up with Geddy Lee!

I got a kick out of this YouTube comment: “She even looks like Geddy!”

Maybe you start looking like the master if you study his tunes long enough, so get ready for your glasses and curls… and while you are at it:

Learn the theory behind power chords and more…

Empowerquite literally! – your bass lines using power chords.

In this episode of Talking Technique, I show you how Geddy Lee masterfully used root-fifth power chords to drive the well known Rush tune, “Dreamline”. We’ll talk optimal fingerings, plucking, and where on the fretboard to drop these. You’ll also hear the difference between a single note groove vs. the power chords used by Geddy. (*And just for fun, anyone know his real first name, and how he wound up with the nickname, Geddy?)

So power up your bass lines and level up your bass toolbox with the power of fifths on your bass!

Download the Transcription PDF here

* It’s Gary, and as the story goes, his Grandma had a thick accent and couldn’t quite enunciate the “r”, so “Gary” became “Geddy”!


You might also be interested in these posts:

Left Hand Technique

Overgripping

Gadgets for Technique Practice?


Core Principles Ariane Cap

This really clicked for my student: Triads [Get your bass]

Note Naming Realization

From my student Christine:

The note naming exercise was amazing for triads, to figure out that A-C-E is always A-C-E even when it’s Ab-C-Eb or A-C#-E or A-C-E, etc. I must have skipped that realization!

YES! Big thumbs up for that insight, Christine! It is precisely one of the reasons why I am so big on ensuring my students understand:

  • how notes relate
  • what these relationships look like on the fretboard (with good fingering while we are at it!)
  • the importance of learning intervals (learn them first and learn them well!)
  • the importance of note naming

Chords are made up of thirds! Know your thirds, then it’s easy!

Here is what Christine meant when she said “A-C-E is always A-C-E”:

All these chords have “something” A, “something” C, “something” E – “something” meaning: natural, sharp or flat. 

Triads are made up of stacked thirds.

There are major thirds and minor thirds that make sense to look at in this context (diminished and augmented thirds exist as well, but we don’t need them in this context).

There are four options to stack major and minor thirds:

  • minor on the bottom and major on top => minor triad (ex: A-C-E). The outer two notes frame a perfect fifth.
  • major on the bottom and minor on top => major triad (ex: A-C#-E). The outer two notes frame a perfect fifth.
  • major on the bottom and major on top => augmented triad (ex: A-C#-E#). The outer two notes frame an augmented fifth.
  • minor on the bottom and minor on top => diminished triad (ex: A-C-Eb). The outer two notes frame a diminished fifth.

Grab your bass and play those four chords:

  • Notice how between Am and A only one note changes, namely the C/C#. Play these two triads back to back a few times. Listen and feel what happens in your fingers!
    • When you play them back to back in this fashion, you can actually hear it: minor sounds sad (darker); major sounds happy (brighter)*
  • Notice how between Am and Adim only one note changes, namely the E/Eb. Play these two triads back to back repeatedly, and again listen and feel what happens in your fingers!
    • Notice how eery and tense the diminished chord sounds compared to the dark, romantic minor triad
  • Now notice how when playing the A major triad back to back with the A augmented triad only the top note moves, the E changing to the E#!
    • What do you think of this augmented triad? Hear how mysterious it sounds and the tension it creates?

* Check out our Ear Confidence Course to learn more!

Where do all these triads come from?

Let’s take a look at where all these triads could originate from within the major/minor system. A minor, for example, could be the sixth scale degree of C, the second scale degree of G (the diatonic chord scale is Dorian in this case), or the third scale degree of F (associated with the phrygian mode)!

Check it out below, where I wrote the origins of the various triads under each triad.

You will see that some triads don’t make sense in this context. For example, Ab minor can be a vi and a ii chord alright, but Abm could not be a iii chord – it would need to be called G# as that originates from E major (third scale degree). Calling it Ab minor would mean it’s from Fb major and that is not a scale you want to associate it with (it would be unnecessarily cumbersome!).

Similarly, A# major triad: It certainly does exist and may come your way, as a secondary dominant for example. But much more frequently occurring will be its enharmonic spelling, Bb major. I scratched out the ones that don’t work so well with “something”-A below and renamed them (doing that is called “enharmonic spelling”).

What’s with the Augmented Triad?

The augmented triad does not fit into the major scale or its modes, but it does fit into the melodic and harmonic minor scales. Augmented (and diminished) sounds are also part of symmetric scales such as the whole tone scale or whole/half tone scale.

Ariane Cap note naming triads bass

Definitely play all of these chords on your bass. Arpeggiate them rather than playing them as a chord. I just find them easier to compare visually when they are written up as a block chord.

For a detailed discussion about triads and loads of other chords, including tips on fingering and musical applications, check out my book, Music Theory for the Bass Player.

And get inspired to create grooves with these materials in my course! Enjoy! And thanks for the email, Christine!


Want to learn more about the sounds these chords make? Check out our course: Ear Confidence – Six Paths to Fearless Ears