Persuasive Point For Good Bass Technique

In this blog post I will put a bit of attention on the importance of good overall bass technique when playing and tell you about an awesome experience I had a few months ago that plays right into healthy bass technique.

Effective Bass Technique – My Take in a Nut Shell

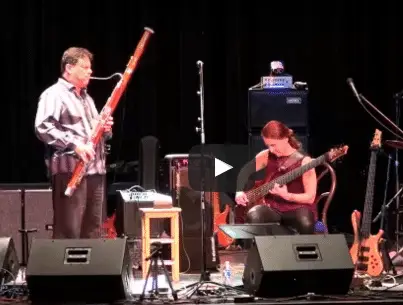
I believe effective right hand/left hand positioning, coordination between the hands, a symmetric and overall comfortable body posture while playing are all extremely vital for an enjoyable playing experience – your own as well as that of the listener! You can hear good technique and you can see it, too. Even seemingly remote details play into an effective overall playing experience: where is the music stand is positioned, how do you use your eyes while reading a chart, how is your bass set up etc. 

Since we are all put together very differently, it makes no sense to give detailed instructions as to how to exactly position each finger, the shoulders etc. Angles differ as our bone lengths are different and the relationships of our limbs to each other vary. Basses also come in different shapes and sizes. It does, however, make sense to to give general guidelines for consistency and automation. I recommend various awareness practices that help you feel into your body. In addition I believe in exercises that improve a particular aspect of bass technique, such as coordination, dexterity etc.

Lots of playing habits are mostly unconscious and tend to stay that way until a problem arises – maybe a speed bump, maybe inconsistencies in your playing, or fatigue in the middle of the set. It can be a shock to be in the studio, solo the bass track and find that what we thought we played quite cleanly, actually has all sorts of avoidable noises, inconsistencies in tone or timing and sloppiness. Avoid a bad wake up call like that and shine some light on the situation!

in my view, awareness exercises should have these general goals:

• Be thrifty with movement (i.e.: don’t move more than you need to. unnecessary motion slows you down, wastes energy and can lead to audible artifacts)

  • Go for the most relaxed state, use only the muscles you need (no overgripping, no unnecessary tension)
  • Listen to your playing: is your tone even? Are there any unwanted noises or buzzes? How is your phrasing? Your timing? Does it sound like you envision it?
  • How do various parts of your body work together? How does an adjustment of a particular angle affect the other parts of your body and your tone?
  • What details in your playing can you “automate”, ie, practice so well that execution becomes seemingly automatic (A good example for powerful automation is using alternating fingering in your right hand. If you consistently alternate index and middle ingers you don’t have to decide which finger is next as the two are on autopilot. This frees your mind to think about the music.
  • To be aware of the environment and other details: economic positioning of music stands, sitting versus standing, bass strap lengths, set up etc.

Why is Good Bass Technique so Important?

  • You can feel it. What and how you feel transfers (translates) to your audience.
  • It is a core ingredient on the path to (seemingly) effortless playing.
  • You can hear it!
  • It is a foundation upon which being able o express yourself on your instrument is built. It enables you to give your tone intention (intention of phrasing, dynamics, note length…).
  • It gives you speed and agility (makes playing slow and fast so much easier)
  • And: last but by no means least, it keeps you healthy!

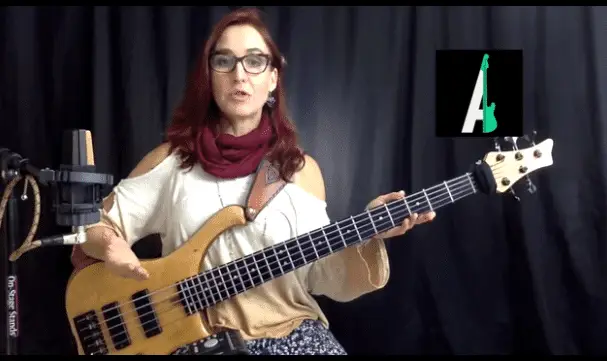
For more insights and many exercises on the aforementioned topics please check out Chapter 12 of my book, Music Theory for the Bass Player. Countless photos detail instructions and suggestions for proper posture. The book also contains a powerful technique for changing ingrained habits, called PORA. Also check out my videos on technique at notreble.com (a series called “Talking Technique”).

My Adventure with Biofeedback

In February  of this year (2015) I was laboring with a pain in my right arm that was hard to exactly localize. It started after painting a bathroom and getting a new Beachbody work out DVD that I was going to town with using very heavy weights. I cannot exactly pinpoint what it was that started the pain but it came suddenly and enveloped most of my right arm.

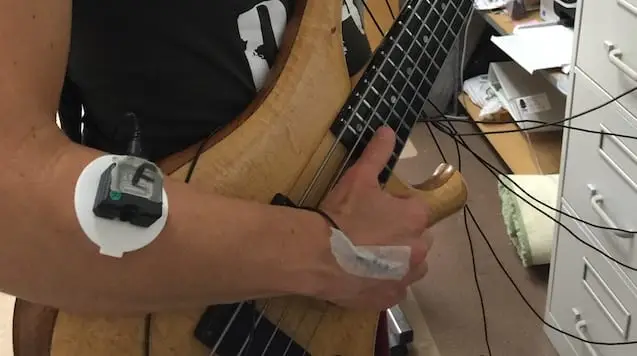
In my search on healing back in spring I got referred to ergonomic specialist and biofeedback practitioner Kathy Bender. As part of our work together she was to examine my habitual use of my body and document it using biofeedback. By putting electrodes on key muscles I could see the amount of tension translated into a wave form on the computer and teach myself in real time to relax certain muscles. So she had me do various every day tasks, from eating, to holding a cell phone, to typing on the computer… all while being hooked up to the wires and practicing how to do all that with less tension. I learned that I was unconsciously pushing my head forward when drinking or that I put extra strain on my neck when holding the phone to my ear. One day she recommended I bring in my instrument since I spend a substantial amount of time on it every day.

Biofeedback Bass Playing

IMG_3030
In Kathy Bender’s office, hooked up to biofeedback. Good overall posture when looking up

IMG_3028
Good posture when looking on the fretboard

Biofeedback Bass Playing
Slapping

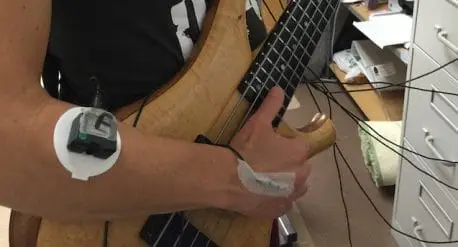
So there I was all wired up to the biofeedback machine with electrodes on my elbow, my neck, my upper back, practicing relaxing while doing all these tasks which all showed a lot of unnecessary tension. Then I put my bass on. The second I did that all the waves showing tension dropped dramatically. The difference to my non-bass playing habitual posture and muscle use was stunning! It was an amazing confirmation of my years of working on my technique. The focus I had put on relaxing my muscles and playing with the most relaxed stance had paid off. I had the feedback from the computer screen right in front of me. Kathy and I joked that I should just run around with my bass on all day long, then all would be fine.

My arm issue took a long time to heal, but I am now about 95% pain free. Dealing with this has renewed my appreciation for a pain free state and healthy body parts (easy to take for granted!). It also once again drove home the importance of healthy bass technique. The experience in Kathy’s office also encouraged me that practicing CAN change unconscious and engrained habits. This is very encouraging, I think, and I take that fact beyond just bass technique and bass playing…!

Recommendations

I want to make a few recommendations for practitioners who have helped me put my arm back together and who also reviewed my book, with special focus on the Technique Chapter:

Robert Markison, MD, Hand Surgeon, Musician, Artist. San Francisco

Kathy Bender, Biofeedback and ergonomic specialist in San Francisco

Bassist and chiropractic Randy Kertz has written a lot on dealing with injury prevention for the bass player. Check out his book as well as his many videos and articles on the web. Great tips!!

Conclusion

To me it is all one – awareness of hand positions on the neck, good fingering, thinking ahead, being relaxed, feeling great. For me, playing well includes food, sleep, working out, comfortable shoes. (Okay, I sometimes draw the line with the comfortable shoes, I admit it. A gal and her heels, you know….!)

Oh, and one more thing, just to make sure there are no misunderstandings: music and musical expression always come first. When you are performing and the music bends you this way or that, let it. If the intensity of a solo twists you into submission to reach that last ounce of feeling, go with it. If you have so much fun laying down that groove for the dancers that your own feet go wild, by all means, do not hold back.

In other words: when the music moves you, don’t worry about stretching out your pinky finger or pulling up your shoulder. When the music moves you, let it!

When you practice, however, give attention to your pinky finger, your shoulder and all the rest. Practicing is the time to establish a healthy, comfortable, economical way of playing so that the energy can flow freely and the music can soar.

 
Our Course – Music Theory for the Bass Player • The Course – contains a comprehensive and step-by-step technique component called “Finger Kung Fu.
Music THeory for the Bass Player The Course

Intervals – Ultimate Introduction! (BB#6)

This video is an introduction to intervals. In it, I tackle everything from interval quantity, quality, major/minor to diminished/ augmented. And I make sense of the question why E to Gb would be a diminished third, but E to F# is a major second. Tune in. This is the foundation for lots more to come on these gems. They are the basic building blocks of everything – scales, triads, chords, extensions…
Continue reading “Intervals – Ultimate Introduction! (BB#6)”

The Value of Pauses for Practicing

How can we influence our habits? Specifically of interest for musicians – our practice habits! How can we reach our peak potential? How can we make our time in the practice room most effective?

These are questions that have interested me for as long as I have been doing music. I devour books on learning psychology, sports psychology, brain plasticity, brain health, habits and so on. For a while I took a detour from music to focus on these topics exclusively. NLP helped me personally with some issues, so I wanted to study it and became a Master Practitioner and Trainer, trained by the folks who developed it, such as Richard Bandler, Judith DeLozier, Robert Dilts, Betty-Alice Erickson and others; I also attended Saybrook University’s PhD program for a year;

NLP focuses on how language affects our behavior to achieve better results, be it the language we use with ourselves or how we talk to others. I assisted people with changing their habits for a while, but I could not stay away from playing and teaching music for too long and returned to it as a career. My interest in these matters and what I have learned from NLP and Psychology (and continue to learn) continues to benefit me every day. 

Continue reading “The Value of Pauses for Practicing”

Talking Technique #1: Ari on NoTreble.com

Talking Technique: Ari’s new series on NoTreble.com

I am very excited to be a contributor on one of my favorite bass websites, NoTreble.com, as of today. I kicked off my series about Technique (“Talking Technique”) with an oldie, but goodie: the permutation exercise, AKA the 1234 exercise. Check it out and let me know what results you are getting. Some of this content is used in my book on page 146, if you are following along. I included a few creative exercises using a delay pedal and applying the exercise creatively. Enjoy! Click here to view the video.   Ari Ariane Cap Talking Technique   If you’d like to study with me, click here. I use Marleaux Basses and Dean Markley Strings. Fretwraps by Gruvgear, pedals, amps, cabs by TC Electronics. (Official endorser of all these fine companies). Thanks to Wolftrackaudio.com for audio post production.      

Bass Bit 5: Dots Exercise for Note Finding (BB #5)

Another Great Note Finding Exercise: Dots on the Fretboard

Here is another note finding exercise that is quite simple in its set up, but that can turn into quite a mind bender when doing the advanced variations:
Name-a-Dot is one of those exercises you can do away from the bass. Takes one minute or less and the pay off is huge. How fast can you do it with double flats?

Transcript:

Hello! Welcome to Bass Bit #5! Today is all about connecting the dots – the dots on the fret board that is. Obviously, they are there for orientation. Some basses start with their first dots right here on the first fret. Most basses start on the third fret, and then it’s usually third, fifth, seventh, ninth, and then two dots on top that mark the octave. Now some basses have twenty-four frets so this whole thing will repeat. Some have a few less than that, some even have a few more than that but basically the pattern will always repeat and help you orient yourself and find your notes and here’s a great exercise for you.

It’s one of those exercises you can do away from the bass or you can do it just sort of at random times during the day – every time you walk by your bass, or walk through the room, or go to the bathroom or something like that. It takes not even a minute and it has a truly great effect. So here’s how it works. You pick a dot and you pick a direction. Let’s say, I’m going to  go up. I’m starting ascending and then descend and I’m going to pick the first dot. I’m just going to demonstrate that on all the dots. I like to set a tempo, as always, as it helps to ensure that you are consistent. And if you want, in the beginning, you may want to have a couple of beats go by. Like [playing: 1.31] G…[playing: 1.33] C… think about what’s next… [playing: 1.35] F…[playing: 1.37] Bb…

Or you can just go: [playing: 1.39 to 1.42] Bb – F – C – G…

Could I say that using sharps? Yes I can: [playing: 1.45 to1.51] G – C – F – A#; A# – F – C – G.

I could even do this: [playing: 1.53 to 1.58] G – C – E# – A# – E# – C – G.

I could even do this: [playing 1.858 to 2.04] G – B# – E# – A# – E# – B# – G.

So you get the idea. I could even do this:  [playing: 2.07 to 2.12] Fx – B# – E# – A#  – E# – B# – Fx. Alright, now, since I can do that, I can do the same thing with flats:

[playing 2.16 to 2.23] Abb – Dbb – Gbb – Cbb; Cbb – Gbb – Dbb – Abb.

Kind of a brain twizzler, but again, it helps to understand how music and the bass is organized. So let’s go dot by dot and do this mental twisting exercise. Here we go:

[playing 2.35 to 2.47] A – D – G – C; C – G – D – A ;

Gx – Cx – Fx – D#; D# – Fx – Cx – Gx.

Now, the double flat. How about that?

[playing 2.51 to 2.58] Bbb – Ebb – Abb – Dbb; Dbb – Abb – Ebb – Bbb.

Next stop: [playing 3.02 to 3.14] B – E – A – D – D – A – E – B; – Ax – Dx – Cx – Cx – Gx – Dx –Ax.

Flats: [playing: 3.16 to 3.22] Cb – Fb – Bbb – Ebb; Ebb – Bbb –Fb – Cb.

Next stop: [playing 3.27 to 3.40] C# – F# – B – E; E – B – F# – C# (also known as Db, Gb). And then Cb and Fb if you want: F – Cb – Gb – Db.

And then we can do this whole thing with double sharps: [playing 3.47 to 3.53] Bx –  Ex – Ax – Dx; Dx – Ax – Ex – Bx.

Mind bender!!

Db: [playing 3.58 to 4.04] Db – Gb – Cb – Fb; Fb – Cb –Gb –Db. That was not that hard as they are all single flats.

And we have the double dots: [playing: 4.10 to 4.22] E – A – D – G; (just like the open strings) G – D – A – E.  Or, Dx – Gx – Cx – Fx; Fx – Cx – Gx – Dx.

And, we have the flats on this one here: [playing: 4.28 to 4.34] Fb – Bbb – Ebb – Abb; Abb – Ebb – Bbb – Fb.

So you can see, this is quite some mental acrobatics! But it helps you think about the bass in different ways, helps you shed the notes even if you don’t have the bass at hand. I think it’s a great exercise. And once we know the dots, obviously you’ll get faster and faster and faster in deducting where all the notes in between are. If you know this is a [playing: 4.52] C, that’s a [playing: 4.53] C#. If we think about double flats, flats and sharps and so forth a lot, we’ll get really fast in doing this and it’s useful.

So, enjoy! Let me know what kind of results you’re getting. Please comment. Let me know how it’s going. If you have any questions, you can find me at the Contact Me link. Alright, thanks for watching.

 
Ari's Bass Blog, Marleaux Consat Custom 5, free lesson on notes
If you’d like to study with me, click here.
I use Marleaux Basses and Dean Markley Strings. Fretwraps by Gruvgear, pedals, amps, cabs by TC Electronics. (Official endorser of all these fine companies).
Thanks to Wolftrackaudio.com for audio post production.

Q&A: Playing Chords

Q&A: Playing Chords

Brian S. asks:

Do you find string spacing to be an issue with your chord playing?  Meaning do you want smaller string spacing or wider string spacing when you go into a gig where you are expected to play outside the normal bass role?  Do you have separate basses you use for chord work and other basses for more traditional bass roles?

Thanks for the question, Brian. I usually use my six string for my duo (where I am playing chords a lot), so yes, different basses for different jobs for me. For grooving gigs I pull out my five or four strings, but for chords the high C string rounds out the sound beautifully, and with the extra string I have access to more notes (although a six string has only 5 more unique notes than the five, but the layout benefits!)

A few general tips for embarking on your chord journey:

  • For Jazz, in any ‘voicing’ consider leaving out the fifth; for rock and pop styles, experiment with powerchords (roots and fifths).
  • Avoid muddy sounds through spreading chords apart (for example instead of a voicing of ACE on the upper three strings, play AEC, porting the C up the octave, this would be an example for an open voicing.) This is also the place to experiment with chord inversions.
  • An easy place to start: try tenths! The root plus the major or minor tenth (octave plus a third) on top make for a beautiful and easily accessible voicing.
  • Experiment with leaving out the root, especially with common chord progressions. Thirds and sevenths define a chord, so try with those sounds, and forget about the root, the ear is so used to certain chord combinations, the chordal sequence will be clear, even without the root spelled out.
  • Check out extensions and alterations (even if the chord in the chart doesn’t list any) – they add beautiful colors:
    • for major chords: add major 9ths, major 13ths and #11ths.
    • for minor chords: add major 9ths, 11ths and b13ths or major 13ths.
    • on dominant chords: add b9ths, #9ths,#11ths, b13ths (or major 13ths, for a HalfTone/WholeTone sound). The major ninth or major 13th also work and go together well.
    • on diminished chords emphasize the flat five; a good extention here is the 11th.
    • on augmented chords think whole tone scale, for example, and use extensions from this pool of notes.
  • The above means you often have to stretch over wide distances; to enable that, I like to bring my left hand thumb into the equation (Steve Bailey is my inspiration for that), or use two handed tapping to really allow for access all over the bass.

Bass:

I totally recommend a separate bass for your chord work. If you don’t want to take the plunge to switch to six, consider stringing your chord bass ADGC (or EADGC, respectively); use lighter strings. You may prefer a lower action than for grooving as well. Your chord bass also needs to be perfectly in tune with itself in the higher ranges. Basses with 24 frets are handy!

Also a great piece of equipment: fretwraps by gruvgear. They help you mute unwanted string ring in situations where you are not using open strings.

Spacing:

I like all my basses to roughly be spaced the same so I don’t move from one to another and it feels differently. On Marleauxs you can adjust the spacing, so I have a lot of freedom there. When I talk about stretching for chord voicings don’t assume that closer string spacing will solve the ‘problem’ of stretching, as the difficult stretches are happening over 5 or more frets – stretching across the strings is fine with pretty much any spacing, I think. (Actually having more ‘room’ to space the fingers out can be nice, especially for folks with loong fingers, which is not me!)

A few more tips for playing chords and situations that ask for chords:

  • Work with the sound on your bass and amp, emphasize mids, take back the lows, bring in more highs.
  • Great excuse to get some pedals 😉 …. reverb is very nice for example; I use the EBS Dynaverb, but there are many options out there and TC has a great one!
  • Incorporate open strings; they make for great pedal points (root or fifth of the chord works great)
  • Think of all the sounds you can make with the bass: harmonics, percussive effects with dead notes, slaps, pops etc. It will add variety in a situation where bass is up front.
  • Here is a compositional/arrangement trick: keep the top note (or notes) of a chord the same, move the bottom note (or notes). Or the other way around: move the bottom, keep the top.
  • Don’t think you have to play chords all the time (block chord style). A chord here or there and a few melodic or licky bits in between sounds great! Always serve the song!
  • Don’t play chords in a band situation, unless the arrangement really calls for it, and the rest of the accompanying instruments are in on it. Intros work great for example: try working out a rubato intro with a singer… very nice!

If there is enough interest in this topic, I can make a video series on the topic. Let me know.

If you need explanations on chords, extensions, alterations and other theory terms in this article, check out my book.

I’d love to get some videos from you all giving some of the above a whirl. Even if you are strictly a groover, give it a shot. It’s fun 🙂

Have fun,
Ari

PS: Here is a video of me playing Stella by Starlight with my duo partner Paul Hanson. We have never shared this one before, recorded at the Empress Theater by Bob Hakins, February 2015; enjoy!


If you’d like to study with me, click here.
I use Marleaux Basses and Dean Markley Strings. Fretwraps by Gruvgear, pedals, amps, cabs by TC Electronics. (Official endorser of all these fine companies).
Thanks to Wolftrackaudio.com for audio post production.
 

Bass Bit 4: Free Lesson on Notes: The Notefinder (BB #4)

The Notefinder

This is a very powerful exercise to start you off towards knowing the notes on the fretboard. I have covered this exercise in the Cycle videos as well, but based on some questions I have gotten, I decided to go over it again, nice and slow. It is all about the magical numbers of 5 and 7!

My friend Sonya Jason gave me a dice like that: Role a dice for your notefinder of the day!


If you’d like to study with me, click here.

Transcript:

You may already have noticed that between two strings [playing:  0.18], there’s always an offset of either five frets or seven frets. Now remember those numbers because they’re very very handy.

[playing: 0.26 to 0.28] Fifth fret on my E string gives me the same note as the next string up as an [playing: 0.32] open string. So these [playing: 0.32 to 0.34] two strings are offset [playing: 0.36] five frets from each other. Now if I reverse this, meaning I finger the note E on the A string, that is the same note, E, as the [playing: 0.43 to 0.44] low open E string on the seventh fret of the [playing: 0.45] A string, meaning I’m fingering an E on the A string, on  the seventh fret. So, [playing: 0.52] seventh fret on A, go on the other way [playing: 0.55 to 0.56] gives me the open E string. Five and seven are extremely important numbers.

If I try to find one and the same note all over the bass, there is a great exercise that you can do. I recommend it so much that I make it a must do for my students for quite a while! It is a great way to get a head start on figuring out the fret board.

So here is how it works.

Let’s say we are going to find the note G. You have to be diligent and follow instructions precisely and use a metronome, very important. I’m going to demonstrate how this works.

The idea is to find the note G on all [playing: 1.37 to 1.40] four strings. I’m just going to demonstrate this as if it were a fourth string. So, we find it on the E string, G is on the third fret: [playing: 1.47] third fret, E-string. Then I’m adding seven, and that’s three plus seven [playing : 1.54] makes ten, so that puts me up here on the [playing: 1.57] tenth fret of the A-string. Okay, so I just went “plus seven” from one string to the next. Let’s do that again, let’s see what happens.

If I [playing: 2.03] again add seven, I’m ending up on fret number [playing: 2.07] fifteen. That’s a G, right? But now I’m going to make an additional rule: for the purpose of this exercise, you have to stay below the double dots. Staying below the double dots – this means [playing: 2.20] I have to take this note on the 17th fret down twelve frets. So  [playing:  2.23] if I take this down twelve frets, I’m ending up on fret [playing: 2.27] five. Again, I came from the [playing: 2.29] tenth fret to either the [playing: 2.31 to 2.32] seventeenth fret minus twelve – [playing 2.34 to 2.35], ie fifth fret. We’re still doing the G’s right. So [playing: 2.38 to 2.39] ten minus five, there’s the five. So plus seven or minus five gives me the same note on a different string.

Now, this is an interesting scenario because I am on the [playing: 2.57] fifth fret and I can go either way and still stay below the double dots, which is the rule (I mean for myself for this exercise: just stay down here because up there, everything repeats anyway).

So I am on the fifth fret, [playing: 2.58 to 2.59] five minus five is zero. [playing: 3.00 to 3.01] That’s a G, right? [playing: 3.02 to 3.04 ] Five plus seven is twelve, that’s a G, right?

So what does the exercise look like? As always, if we cannot do it in time, we cannot do it. And we need a little bit of help for that. Put the metronome on, it will keep you honest. Because this is what will likely happen: You are going to go [playing: 3.19 to 3.23] “G, I’m cruising G…. I know this”.

You don’t, unless you put on the metronome and stay honest and true to the click, you don’t. Now, you are allowed to set the click to a very slow tempo. I think I said that in an earlier bit. Do not set it to a glacial tempo where you don’t really get a sense of a groove – this is great for other exercises but not for this one. For this one, I want you to get a sense of a groove so set it to a tempo that’s nicely moving; something like seventy or so, and then let two beats… or three beats… or even four beats go by, if you need to.

My exercise might look like this: [playing: 3.55 to 4.08] G *tick *tick *tick, G… and while this is happening, you think ahead where you need to go next. That is crucial because that is a skill that happens in music just the same. And by the way, when I get to the top, I do not double up. You go up, you go right back down. Also, do not skip strings. This [playing: 4.18 to 4.19] is cheating. Of course, [playing: 4.20] you know that that’s an octave. That’s got to be another G. But you are allowed to make a mental note while you’re down here [playing: 4.24] saying “Okay, I will get to the last string and my note is going to be right there.” You can do that.

Okay, so I have a dice. My friend, Sonya Jason gave me that dice; it has twelve sides and it has the note names of all twelve notes on it. So throw the dice, whatever note it lands to, that’s your note for the day. Let’s say the dice says Bb. Okay, so I’m going to play my Bb, set my metronome. So here we go:

[playing: 4.53 to 5.13] to Bb – Bb – Bb – Bb… and all these numbers should be either five or seven frets apart. Let’s see if that’s true. Six minus five is one… plus seven is eight… minus five, three. So there you go, it’s always a distance of five or seven frets. Now if the click keeps going and you feel like [playing: 5.17 to 5.21], “No, I don’t need this beat in between. I can cruise this.” Go ahead.

[playing: 5.24 to 5.35] Bb – Bb – Bb – Bb. Now I am doing one a click, right. Good for you. Now if you’re starting to get really good at that and feeling good about it, double up the tempo. Do two notes per click. That’s all you have to do. You’ve done it for one round of a note.

Extremely powerful exercises. Again, always do it in time. And this distance of five or seven notes is really a distance you want to get into your muscle memory. There is also a variation of this exercise in the book where you will be doing this blind, without looking. Takes a minute but it pays off. So check it out. I highly recommend this exercise. Go for it!

I use Marleaux Basses and Dean Markley Strings
Thanks to Wolftrackaudio.com for audio post production.

Bass Bit 3: The Range of the Bass (BB#3)

BB #3 The Range of the Bass (Free Lesson)

Short and sweet, Bass Bit #3 gives you a little excerpt of chapter 2, talking about the range of the bass (page 10) and what it means that we are a transposing instrument. Useful to know how the range of the bass fits into the sonic spectrum of the band. Let’s find middle C (AKA C4), sonically and on the score.

Range of the Bass
The little 8 is sometimes used to point to the fact that the bass reads an octave higher than it sounds. 8vb (octava basso) means: transpose down an octave. This is also true if the 8 is missing.

Chapter 2 gives a detailed account of not only the range of the bass, (four-string, five-string, six-string, take your pic), but also on how the bass is organized. It contains two tongue-in-cheek “Test Your Understanding” sections and a few great exercise for finding notes, which I am introducing in the next bits.


If you’d like to study with me, click here.

Transcript:

Bass Bit #3. Welcome! The bass – how is it built? What are the relationships of strings to each other? We are now in Chapter 2. It is Chapter 2: How the Bass is Organized and there is quite an extensive explanation about the range of the bass. There is a “Test your Understanding” section. These are really fun, they’re brain twizzlers. So, if you think you have a handle on that and don’t need that chapter, then jump in right there. If some of those are confusing, then make sure you understand why they are, what they are. The answers to all questions are in the back of the book, in the appendix.

I’m interested in the range of the bass. It is the lower end of the spectrum sonically, but the piano beats us by two notes. Even my five-string here with a low B-string is not the lowest string of all instruments or the lowest sound of all instruments. Now the piano is an instrument we play with a lot so we should know how we fit in to that sonic spectrum and the low A on the piano is in fact a whole step lower than my low B (I want to be the lowest! I just can’t get over that).

So, that A is called A0. And the convention I’m using in the book is a commonly used one. So A0, so that makes my [playing: 1.50] B, B0.

Middle C, maybe another note you are familiar with on the piano! My middle C is up here: [playing: 1.56]. Now, mind you, that makes that – that’s C4  or middle C, that is C4 [playing: 2.01], so that’s [playing: 2.03] C3, [playing 2.04] C2, and [playing: 2.06] C1 because it’s [playing: 2.08] B0 and then [playing: 2.10] C1. So the numbers switch on the note C every time.

Reading-wise, we should know that the bass transposes. It’s a transposing instrument, when it comes to reading. What that means is, that, if I read a middle C, I am in fact playing this note: [playing: 2.29], which means it sounds an octave lower than written. That is done this way, so that we don’t have to deal with a lot of ledger lines. The area sonically where we live would have to be notated with a bunch of ledger lines in order to mark it out in the right octave, hence the convention is, to transpose it up an octave in the score and to just say, “Okay, we know we’re reading up here but sounding an octave lower than that.”

If you would be doubling something with a piano player and the composer would want you to be in the exact same octave, the piano score would look differently than your own score because the piano does not read transposed by an octave; they’re dealing with all these ledger lines or maybe with something called 8vb (“octava basso”), which is another shorthand for saying “take it down an octave”. Now on bass, we are always 8vb. And sometimes you see a bass clef on our score that has a little “8” on the bottom, that’s yet another way of saying: “go down an octave”. But, typically we know that; we don’t need the little 8 or 8vb to tell us.

That was Bass Bit 3. Let me know how you’re getting on. I love hearing from you. Please send me a comment, send me questions. Thank you so much! Music Theory for the Bass Player, Chapter 2: How Notes Are Organized, A Little Excerpt.

I use Marleaux Basses and Dean Markley Strings. Fretwraps by Gruvgear, pedals, amps, cabs by TC Electronics. (Official endorser of all these fine companies).
Thanks to Wolftrackaudio.com for audio post production.

Bass Bit 2: Musical Alphabet Soup (BB#2)

Practicing without the Bass: Musical Alphabet Soup

Alphabet soup
 
 
Knowing the musical alphabet up, down, sideways and backwards serves us very well, yet we usually never practice it. Check out this exercise that will make you doubt you ever even knew those seven letters! In the abstract, these can be quite a challenge.
Once you connect the notes either to a picture of the piano or the bass fretboard, they become easier, so: practicing without the bass informs the fretboard, and the other way round, knowing the fretboard helps us understand notes and their relationships to each other. Because, at the end of it, this is where all of this is going!
Check it out and comment below how you are getting on!


If you’d like to study with me, click here.

Transcript:

Welcome to Bass Bit #2. Today, we’re going to talk about the musical alphabet and I will scramble it up for you. Why is that helpful? It is helpful because we need to know the relationship between these notes – up, down, sideways, skipping stuff, coming at it from all sides. This is something that you can actually practice away from the bass, and it’s very powerful. So I’m pulling up my book here, because I want to look up what page number that is on and it’s page number 6. Its Exercise 1 through 8 – we were doing exercises 9 through 16 in Bass Bit #1 already. So here comes Exercise 1 through 8. We’re going to scramble up the musical alphabet. Again, we’re going to set a metronome and we’re going to say the note names going up, just the letter names.

A – B – C  – D. That’s really easy right? F – G – A – B – C – D…

So far, so good. Let’s reverse this: C – B – A – G – F – E – D – C – B – A – G – F…

That’s still easy. How about we skip one: A – C – E – G – B – D – F – A – C – E – G – B – D – F…

Let’s go backwards with that: C – A – F – D – B – G – E – C – A –  F – D – B – G – E…

I just want to reiterate very briefly what I said last time about the metronome because these exercises are really vital to do with a click; if you don’t, then you’ll cheat yourself out of having to think ahead what comes next, number one. And because you might slow down, and you’re actually practicing bad timing and creating the illusion that in music, if you don’t know something right away, you can take half a second to think about it; well, you can’t!!

In a playing situation, the band will be down the road and you’re still looking for that note. So, it’s really useful to practice this material with a metronome, maybe the first time when you’re figuring it out, you want to really take your time, but then shed it. This is not something you just want to understand. You want to really practice it.

A great way to practice these kind of exercises, for example, is when you are walking somewhere. I used to have a bit of a commute to my bus station – I’m from Europe so you take buses and such; I would walk up the hill and I would go into all sorts of variations, skip two, skip three, go up, go down. It really paid off. Before I knew it, I was at home and I had already done some practice.

What we were just practicing was the conceptual skill. There are several components to playing the bass or any instrument really:

1) the kinesthetic component – where I’m feeling shapes, knowing distances, feeling the sequence of notes under my fingers;

2) an auditory component because it’s music, so we’re hearing it;

3) and there is a visual component – you might be seeing the score in your minds, or you might see the fret board, or you might see the piano keys.

So, when I do these exercises with just saying letter names, they’re not disconnected from me. I see the piano keys, or I can also see the bass fret board as I’m doing that! I also find it very useful to be aware of that because you practice conceptual skills differently than you practice kinesthetic skills for example. Kinesthetic is hands-on – although you can also visualize the movement – that has been shown in research; just visualizing the motion is actually very powerful as well (we know that from Sports psychology).

Let’s do a few more. How about we skip two? So I’m going to start on A, I’m skipping two. So here’s my click…

(clicking continues while saying letters) A – D – G – C – F – B – E – A – D – G – C – F – B – E…

So, interestingly, what I was just talking about is called the diatonic cycle in C major. That’s something we’ll get to. But have a think about it, that’s actually [playing: 4.45 to 4.52] all fourths. Augmented fourth is still a fourth. So we’ll get to all of that.

Alright, let’s reverse that. We’ll start on A, we’re going down two:

(clicking continues while saying letters) A – E – B – F – C – G – D – A – E – B. Okay?

Some of these exercises may seem strange, they may seem disconnected, but when we’re talking about scales, when we’re talking about triads – you’re going to run into questions such as: what’s to the left and the right of a G? for example. And then you don’t want to just know it up, you also want to know it down. You want to know what happens when you skip one, and you want to get faster in knowing how to connect these letter names.

Alright, these are the Bass Bits. This is number 2. I’ll see you at number 3 and arisbassblog.com – please leave me a comment, send me your questions. We are following along concepts in the book “Music Theory for the Bass Player”. Links and also how to study with me in depth are below.

I’ll see you next time. Thank you.

I use Marleaux Basses and Dean Markley Strings. Fretwraps by Gruvgear, pedals, amps, cabs by TC Electronics. (Official endorser of all these fine companies).
Thanks to Wolftrackaudio.com for audio post production.